First Steps
Ruby
Jekyll runs on Ruby, so you will need to have Ruby installed before you can use Jekyll.
If you are on an Apple computer, you might already have ruby installed. Open Terminal and enter ruby --version to check. If you don’t get an error, you are all set.
If you need to install Ruby, on any OS, see the Downloads information from the Ruby website.
Don’t panic if you are not familiar with programming in Ruby. Building a site using Jekyll requires no Ruby programming knowledge. You simply need to have it installed in order to build your site.
Install Jekyll
Once you have Ruby, you can install the gem for Jekyll. Ruby code is packaged into Ruby Gems which can be installed using the gem install command.
$ gem install jekyll bundler
Note, don’t type in the $ in the commands shown. The $ simply indicates a command prompt where you would enter a command. Lines that begin with $ are commands that you would type in. Lines that do not begin with a $ show expected or sample output from running a command.
Build your site
Now that you have Jekyll installed, you are ready to create and explore your first Jekyll based web site.
$ jekyll new my-first-site
$ cd my-first-site
$ bundle exec jekyll serve
In the output, you should see the URL where your site is now running. Jekyll includes a built-in development server that allows you to preview your website. To view your site, look for the line near the bottom that says “Server address”. For example:
Server address: http://127.0.0.1:4000/
Copy that URL and paste it into your web browser. You should see your site displayed. It should look something like this:
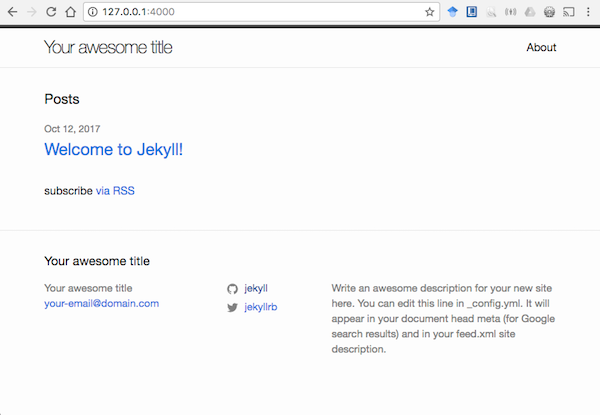
What you see
Jekyll sites are setup by default to use a minimal theme, aptly called “minima”. You can change the theme by either creating your own or using a theme someone else has already created. We’ll talk more about themes later.
First let’s take a look at the site that was created by default. Look inside the directory that was made my-first-site. You should see that it was populated with several files and directories:
_posts- where blog posts go_site- the build directory for your site. Do NOT edit these files.about.md- the about page, what you see when you click the About link on the top rightindex.md- the home page, what you see when you load the site using the server address URL_config.yml- the main configuration file for your site
First, notice that there are no HTML or CSS files here. Those are all hidden in the theme. This makes Jekyll nice for people who aren’t good with writing HTML & CSS for their own sites. However, if you know HTML & CSS, don’t let this make you underestimate the awesomeness that is Jekyll. That just means that you’ll be fine making your own site theme to customize your site.
However, even knowing HTML & CSS, it’s not fun to have to replicate HTML across multiple pages to keep them looking consistent, nor is it fun to write all the HTML tags for headings and paragraphs and images when all you really want to do is focus on your site content. Content pages for a Jekyll site are mainly written using Markdown - a simple syntax that converts to HTML. It is very easy to learn and makes writing content pages simple for anyone.
Let’s take a look at the index.md file. This is your site Home page. Open it in a text editor and you should see something like this:
---
# You don't need to edit this file, it's empty on purpose.
# Edit theme's home layout instead if you wanna make some changes
# See: https://jekyllrb.com/docs/themes/#overriding-theme-defaults
layout: home
---
The information between the — lines is called front matter and it is structured as YAML. There are two main things you’ll need to know about YAML:
- First, it is a key : value pair structure used to set page variables
- Second, if you don’t put it at the top of the file, Jekyll won’t process it.
When your site is built, the index.md file becomes the index.html file. You can find the generated HTML file in the _site directory. Go ahead and check that out in a text editor or view your page source in the browser. All of that HTML is built by Jekyll for you from a combination of the template in the theme and the configuration information in the _config.yml file. Pretty awesome, huh?
In the next section we’ll look at how to configure the default site.