Site Configuration
Main Config
The _config.yml file is the main configuration file for a Jekyll website. Like the page front matter, it is written in YAML. We’ll learn some basic YAML as we talk through the config file.
Open the file in a text editor. The top of the file contains comments explaining the file. Comment lines in YAML begin with the # character. As the comments indicate, changes to the config are not automatically reloaded, so when you make changes to this file, you must manually restart the server process to see them.
Site Properties
Below the comments, you will see the following properties, which should be pretty self-explanatory. Go ahead and update them to have your own personalized information. Make sure to keep the YAML key:value structure intact.
title: Your awesome title
email: your-email@domain.com
description: > # this means to ignore newlines until "baseurl:"
  Write an awesome description for your new site here. You can edit this
  line in _config.yml. It will appear in your document head meta (for
  Google search results) and in your feed.xml site description.
The description property’s value begins with the > on the same line as the property, then has a # for a comment. The actual value of the property begins on the next line. This allows you to enter multiple lines of text in a more readable manner. You might recognize this as the text from the footer on the Home page.
The next two properties may be a little less intuitive. The url as it indicates is the base hostname & protocol for your site. If you are hosting your site on GitHub pages, without a custom domain, the url should be https://username.github.io. The baseurl then is your project repository name.
baseurl: "" # the subpath of your site, e.g. /blog
url: "" # the base hostname & protocol for your site, e.g. http://example.com
The minima theme will add links for social media sites such as Twitter & GitHub through the config file. These are then displayed as links with brand icons. If you do not want these to display (or only want one) just comment them out.
twitter_username: jekyllrb
github_username:  jekyll
Different themes will allow different customizations in the _config.yml file, and if you build your own theme, you can setup site wide properties here as well. The properties are available throughout the site and are accessed from the site object. For example site.baseurl or site.github_username. When using these on a page, they are put inside double curly braces to indicate they are variables that should be replaced.
Build Properties
The remaining setting are build settings. These tell Jekyll how to process your site. Unless you are customizing yours site, you will not need to change these.
# Build settings
markdown: kramdown
theme: minima
gems:
  - jekyll-feed
exclude:
  - Gemfile
  - Gemfile.lock
By default kramdown is configured as the markdown engine. While Jekyll will allow you to change this, you should be aware that if you are using GitHub Pages to build your site, then this is the only Markdown engine it will support. If you want GitHub Pages to build your site don’t change this. If you build the site yourself (and publish only the files from the _site directory), you can change this as you see fit.
The default theme minima is also configured here. You can also edit or remove the theme, but leave this be for right now. We will look more at this later.
The last two proprties gems and exclude are lists. The YAML list syntax is very straight forward, just use a - before each item in the list. If there are sublists, they are indented.
The gems property lists the Ruby gems required for the build. You do not need to change this unless you are adding a new plugin or theme for the site.
The exclude property lists files that are not put into your build folder. If you add any other files, for example license files, that you do not want moved to the build directory, you can add them to the list here.
Test your changes
Remember that you must restart the server process to see changes to the _config.yml file take effect. To stop the process, go to the command shell and enter CTRL-C. This will stop the server process so that you can restart it.
You should see your site updated with the configuration changes that you made, so it will look slightly different than my example shown below.
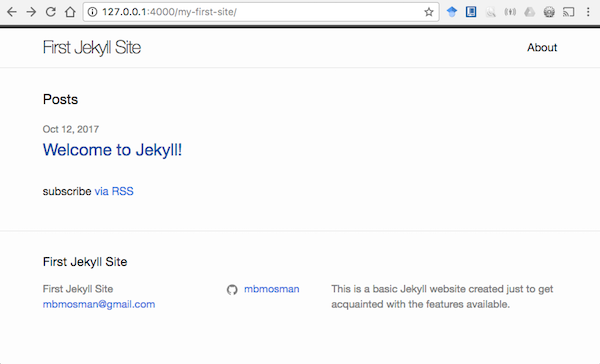
If just try to refresh the page in the browser, it may not appear if you have updated the site base url. You will now need to include that in the path to view your page. Just like before, you can see this path in the output when you start the server.
For example, I set my base url to /my-first-site so now my URL is shown as:
Server address: http://127.0.0.1:4000/my-first-site/
Next we’ll look at the setup for blogging with Jekyll.